The colour coded rings for 15K are brown, green, orange, and 10 K is brown, black, orange. (Here's a web-based resistor identifier.)
last updated Oct 2018; changed
resistor value to 22K from 15k
You don't have to do this for the four smaller valves (tubes). (See what the valves do for more details). The power stage (two 6V6GTA valves) is totally different, and strictly speaking you shouldn't install a new pair without going inside the amp chassis, checking a few things, and possibly adjusting something.
There is an exception. Fender and (I think) Groove Tubes offer a range of power valves which are marked with different coloured stripes, denoting their performance characteristics. If your existing valves are so marked, then you can replace them with a new pair of the same colour-coding, without rebiasing.
See some of the links on the home
page for an explanation as to why rebiasing is necessary in
general; the best is by Lord Valve. I'm going to explain how it's
done specifically for the Princeton Reverb II. Technical terms
will be avoided most of the time. If you can solder and use a
multimeter, you can probably do this job by yourself. If not, get
some help.
All this info is in the public domain, but I'd appreciate it if you regarded this write-up copyright 2002-2018 Andrew Waugh. Thanks.
Terms as used in this site
Amp; the whole combo; cabinet, speaker, chassis, the works
Cabinet; black vinyl over wood; the box that packages the whole
thing
Chassis; the thing which does the actual amplifying; metal box
which is screwed into the top of the cabinet, featuring knobs,
switches, valves, and loads of internal wiring. The dangerous bit.
Reverb Unit; dirty-gold-coloured metal block screwed into the
bottom of the cabinet
Valve; tube to you North Americans
Tube; valve to us Brits
Overdrive; desirable distortion, classic warm heavy sound
Running cold = low cathode current = high bias voltage = long
valve life = harder to get overdrive in the power amplifier = (in
extreme cases) nasty distortion coupled with loss of power
Running hot = high cathode current = low bias voltage = shorter
valve life = easier to get overdrive in the power amplifier= (in
extreme cases) hard to get clean sound
Increase; when I say increase, I mean we're going further away
from zero, so the number goes up regardless of whether it's a
positive or negative number (so 24mA is increased to 25mA and -33V
is increased to -34V)
Comments welcome
I have done this on three PRIIs over the years and the
instructions on this page have survived the scrutiny of its
readers since 2002, but if you know someone with lots of
valve/tube experience, please show them this page. I'd still
welcome a critique. Please also note the list of my own mistakes at the end of this write-up...
Safety / Damage
Disclaimer
Valve (tube) amps develop LETHAL VOLTAGES while
running, and store them in charged components EVEN WHILE
SWITCHED OFF AND DISCONNECTED FROM MAINS SUPPLY. These voltages
are MUCH HIGHER than mains, and higher than anything inside a
transistorized amp. If this scares you, good. Inside a chassis,
don't use your fingers to touch anything which isn't insulated
or earthed (grounded). Don't stick more than one hand in at a
time, and keep the other hand well away. Use fine-nose pliers to
manipulate components. If you're not sure what you're doing, get
local help.
See my site on dismantling for a way to drain the charge, though in my amp the charge seems to fall away within a minute.
The info on this site is believed accurate, but you act upon it at your own risk. I have to disclaim any responsibility for injury, damage, loss of value or loss of gig due to inoperative equipment. The web pages I've given as links all say roughly the same thing, and their content is of course not my responsibility if I didn't write them.
... But if you're going to do it
the thorough, complicated way here's the...
you will need;
A place to work on open
high-voltage equipment without worrying that the kids are going to
stick their fingers inside while you're not looking
A replacement matched pair of 6V6GTA valves or equivalent, eg
CV511. If they're not closely matched, the amp will probably work
fine but in extreme cases you might find it difficult to get a
clean sound. These instructions assume you've bought a matched
pair.
A multimeter, preferably with croc clip probes, capable of reading
20-50mV DC (Voltage, direct current, 20-50 milliVolts) and up to
500VDC
Resistors, quantity 2, 1 ohm, preferably 1% tolerance, half-watt
or 1 watt or 2 watt (they'll all work but 2 watt is less fiddly).
The tolerance of the 1 ohm resistors affects
the accuracy of your measurements. Because of the other
variables, there's no point in getting expensive 0.1%
precision resistors; however if you get 5% resistors they
will definitely be around 5% high or 5% low, and if your
multimeter is a cheap one like mine, the errors could become
significant.
You can do without these resistors if you've got another
multimeter; so one multimeter does 20-50milliAmps, not milliVolts,
(this one MUST have croc clip probes) and the other does 400VDC.
Screwdrivers for getting inside the chassis
Soldering iron, medium fine tip
Solder
Wire cutters
Fine nose pliers
A range of quarter- watt or half-watt resistors, around 56k, 47k,
33k, 22k, 15k, 12k, 10k, 8.2k and 5.6k, one of each value. You'll
only use one or two of these but they only cost pennies. 10%
tolerance is fine.
METHOD
Like another process familiar to many professional musicians, this
comes in 12 steps. Please read them all before starting.
step 1; opening up and
identifying the relevant bits
Dismantle the amp as described in dismantling
the
Princeton Reverb II , and have the chassis firmly positioned
so you're looking down into the naked wiring. Reconnect the
speaker. Don't remove the old valves yet. Remember at all times
that some parts of the wiring could give you a nasty shock unless
you've drained the charge away as described in 'dismantling'.
Don't restrict air flow around the valves.
Digression; While You're in In
There
... there are a couple of modifications
you could do. They're simple, they're cheap, they boost the
reliability and they don't affect the tone. You'd be crazy not to.
Not as crazy as people who go through life without checking out
the claims of Jesus of Nazareth, but crazy nonetheless. Also
please email me and tell me about any inkstamped characters you
find on the metal chassis.
All the time I'm describing the works, I'm standing with the chassis front panel closest to me and the row of valve sockets (we're looking at the 'wires' end of those, not the 'valve' side) running along the far edge of the chassis. The output valve sockets are the last 2 on the right. Everything we're going to be playing with is on those 2 sockets, or on the end of wiring board near those sockets.
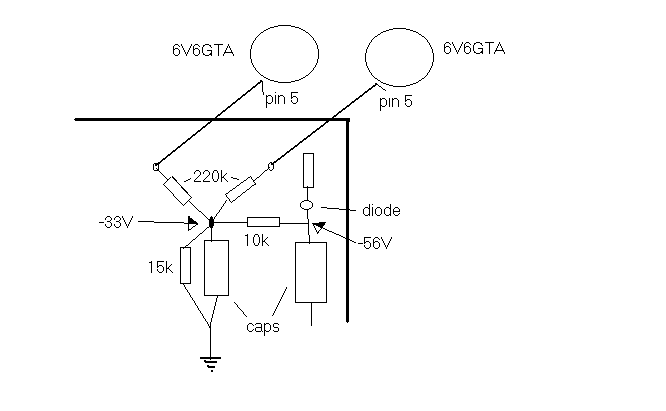
The colour coded rings for 15K are brown, green, orange, and
10 K is brown, black, orange. (Here's a
web-based resistor identifier.)
An unmodified circuit board will look roughly like the above diagram. If someone's adjusted the bias in the past, either the 10K and 15K resistors will be replaced by different values, or there will be one or more other resistors soldered beside them; or if you're really lucky someone's made a good job of wiring in a pot (rotary adjuster like a volume knob) with wires terminating in this neighbourhood; one connection will definitely go to the junction marked -33V.
On each output valve socket there's a short, naked wire braid from pin 8 straight to the metal chassis. Pin 8 is next to the 'key' cutout in the centre of the socket; see this diagram, which shows the socket as viewed from the inside of the chassis.
If there's a 1 ohm resistor in line with the braid, someone's made your life easier. Be happy and go to step 3.
2
Unsolder the braid from pin 8 on ONE socket (DON'T unsolder it
from the chassis). If you've got 2 multimeters and
you're not using the 1 ohm resistors, go to step 4.
(Never, never, never unsolder or cut short a solder joint on
the metal chassis. If you do, you'll need a gigantic soldering
iron to make a new joint.)
If youlve got the 1 ohm resistors, youlre going to solder one end of the resistor onto pin 8 where the braid was, and the other end of the resistor to the braid; so now pin 8 goes down to the chassis via the 1 ohm resistor. Do this for both sockets. These resistors will stay in position permanently so make a neat job which won't vibrate off one day. But next you'll have to touch (or preferably clip) multimeter probes onto pin 8 and the braid, so keep that in mind as you position the resistors.
3
Get the multimeter, clip it across the 1 ohm resistor (i.e. onto
pin 8 and braid), and set it to read up to 50mV. You're reading
the voltage across a 1 ohm resistance, so the answer in mV
converts directly to the same number of mA current, and it's
current (technically
the cathode current) we're really interested in for now.
Go to step 5.
4
If you've got 2 multimeters, and you're not doing the 1 ohm
resistor thing, take one multimeter and clip one probe to pin 8
and the other probe to the braid (which is disconnected from the
pin but still soldered to the chassis). Select a range which will
show up to 50mA. It doesn't matter that you're only checking one
valve of the pair. You're going to leave this multimeter connected
like this right to the end of the process.
5
With a last check that the speaker's connected, and nothing's
touching something it shouldn't; turn volume and master knobs to
zero, plug the amp into the wall and switch it on. After a few
seconds' warm-up the multimeter will probably show something in
the range 15-30 (mA or mV). After a minute or two it may creep up
a little more and then settle at a slightly higher figure. On my
amp this was 28mA. Make note of your figure; this is the cathode
current your old valves have been running at.
6
Now locate the point on the wiring board shown on my sketch above
to have -33V on it (where 4 resistors and a capacitor meet).
Measure the voltage (NOT CURRENT; select a DC voltage range on
your multimeter) from there to the chassis. If the bias has never
been adjusted before, then the result will be pretty close to
-33V. Whatever, make a note of the actual voltage. Switch off the
amp and wait a few minutes to let the valves cool. Note that the
actual figure for this voltage isn't important in itself - it's
there to control the current you measured at the valve socket,
which IS the important figure. But make a note of the
voltage anyway.
7
Unplug from the wall. Remove both old output valves. (It's a
straight pull out. Pull back the spring-steel clips and try to
pull by holding onto the plastic base of the valve instead of the
glass.) Put new ones in, again pushing on the base and not the
glass (the base and the glass can become unstuck from each other).
Be ready to measure the current at the socket again (or the
voltage across the 1 ohm resistor; from now on I'm only going to
talk about current, OK?). Plug into the wall, switch on and watch
the cathode current very closely.
(I say "watch the current closely"
because, on my first new set of valves, the current went straight
to 48mA for a while and then off the scale (which was 60mA max). I
believe this is called thermal runaway; it probably represented a
valve life of 5 minutes. It definitely means that if I'd just
swopped valves and hoped for the best, I would have fried the new
ones before I got to my next rehearsal. It took 2 rounds of
adjustment to get it running sensibly)
With new valves, it may take 10 minutes before the current stops
creeping up.
If your current settles above 35mA or runs away like mine did, switch off asap and go to step 8 or 9 for reducing the current.
All the other what-ifs depend on
what sort of sound you want, what the current settles at with new
valves, and whether your amp's already been modified. So stand by
for a lot of 'ifs'. A 'normal' current probably lies within
12-25mA.
If the current settles within 2-3 mA of the old valve reading, connect a guitar, switch on, let it warm up for 5 minutes, turn the volume and master up (they were on zero, remember) and play. (It may not be the best listening conditions but use your imagination. And play loudly.) You're listening for how much overdrive you're getting at high volume, and how loud it is when that effect kicks in. You might want plenty of that, or none, depending on whether you're blues or country or whatever. If you like what you hear, you're finished, except for the checks in step 11.
If you know you want
something cleaner, go to step 8 or
9 for reducing the current.
If you know you want more overdrive and/or it's impossible to get
a clean sound without nasty, undesirable distortion, go to step 8 or 10 for increasing
the current.
If the current settles (about) 4-6 mA higher than the old reading, play and listen, but you're probably in the easier-to-get-overdrive / shorter valve life department here, and you may want to go to step 8 or 9 for reducing the current.
If the current settles (about) 4-6 mA lower than the old reading, play and listen, but you're probably in the harder-to-get-overdrive / longer valve life / (extreme case; impossible to get clean sound without nasty undesirable distortion) department, and you may want to go to step 8 or 10 for increasing the current.
8 Adjusting the Cathode Current; Pot Fitted
If someone's fitted a pot (rotary adjuster), put one hand behind your back and use the other hand and an insulated tool to adjust the pot while watching the current. If it goes up when you wanted down or vice versa, no problem, just turn it the other way. Get the value you had in mind, leave it for 5 minutes and correct any slight drift, and then play and listen. SAFER VERSION of this step involves switching off before tweaking, switching on again to test. Takes longer (due to warm-up time) but you're not fiddling with live, running equipment. Once you're happy, go to step 11 to finish off.
9 Adjusting the Cathode Current; No Pot Fitted; Decreasing the current
Turn off the power and disconnect from the wall.
To decrease the current (current is now way too high, or you just want cleaner, longer lasting operation) you will need to INCREASE the voltage at the point on the diagram marked -33V. (Both valves are adjusted by this one voltage). To do this you will need to DECREASE the 10k resistor (or whatever's in its place now) OR INCREASE the 15k resistor (or whatever's in its place now).
If there's another resistor soldered in place beside the 15k resistor, unsolder it. That will return (increase) the total resistance to 15k. Repeat steps 5 and 6.
If there are only the original 10k and 15 k resistors, take one of your range of spare resistors and solder it alongside the 10k resistor as shown here. DON'T solder onto the lead of the little glass diode; it's heat sensitive. A high value, say 33k, will make a small adjustment, whereas 10k or less will make a radical difference.
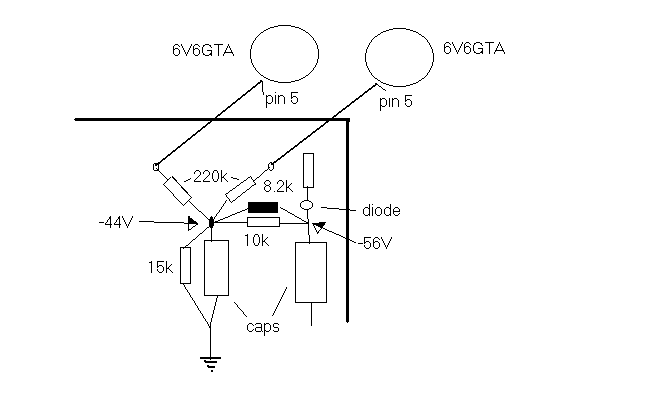
(In this diagram I'm showing my actual voltage value, and the 8.2k
resistor I added is shown in black.)
Now repeat steps 5 and 6. The voltage (factory setting was -33V) should be higher; mine was -44V; and the current at the valve should be lower. Repeat with other resistor values until satisfied.
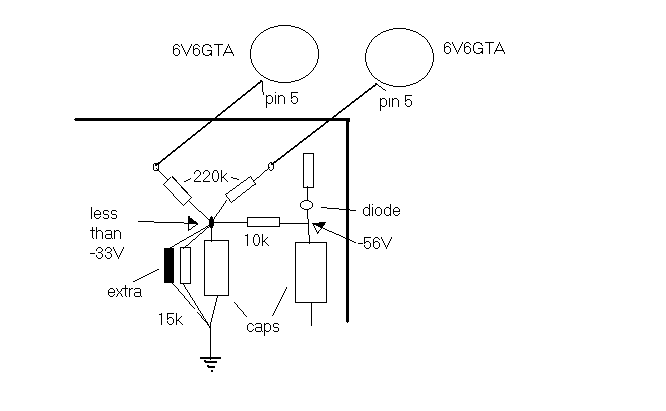
If there was already an extra resistor beside the 10k resistor, either solder a third resistor beside the other 2, or (neater) remove the 'extra' resistor and replace it with a lower value. Now repeat steps 5 and 6. The voltage (factory setting was -33V) should be higher, and the current at the valve should be lower. Play and listen. If necessary, repeat with other resistor values until satisfied.
10 Adjusting the Cathode Current; No Pot Fitted; Increasing the current
Turn off the power and disconnect from the wall.
To increase the current (current is now way too low, or you just want dirtier, hotter running) you will need to REDUCE the voltage at the point on the diagram marked -33V. (Both valves are adjusted by this one voltage). To do this you will need to INCREASE the 10k resistor (or whatever's in its place now) OR REDUCE the 15k resistor (or whatever's in its place now).
If there's another resistor soldered in place beside the 10k resistor, unsolder it. That will return (increase) the resistance to 10k. Repeat steps 5 and 6.
If there are only the original 10k and 15 k resistors, take one of your range of spare resistors and solder it alongside the 15k resistor as shown here.
A high value, say 47k, will make a small adjustment, whereas 15k or less will make a radical difference. Now repeat steps 5 and 6. The voltage (factory setting was -33V) should be lower, and the current at the valve should be higher. Play and listen. If necessary, repeat with other resistor values until satisfied.
If there was already an extra resistor beside the 15k resistor, either solder a third resistor beside the other 2, or (neater) remove the 'extra' resistor and replace it with a lower value. Now repeat steps 5 and 6. The voltage (factory setting was -33V) should be lower, and the current at the valve should be higher. Play and listen. If necessary, repeat with other resistor values until satisfied.
Once you're happy with the numbers and the sound, there are 3 checks you've got to do.
The first is simply leave the thing running for half an hour and make sure the current hasn't drifted more than 1 or 2 mA from where you left it. It's common for the current to increase in this period. Warn other people passing through the kitchen (or wherever you're working) about the dangerously high voltages in there.
The second check is to check the 'static dissipation
wattage' of your valves, which approximates to the cathode current
multiplied by the plate voltage. Zero the volume and master
knobs. Select a high voltage range on your multimeter and measure
the voltage from pin 3 on the valve socket to the chassis. This
will be HUNDREDS OF VOLTS so take care. Make a note of the result,
and multiply it by your final figure for the current. The
current's in milli-Amps (thousandths of Amps) so divide your
answer by 1000. Typical figues might be 429V and 18mA, so
that would be 429 x 18 / 1000 = 7.7. The answer is in Watts
(W) and it represents (approximately) how much power is passing
through one valve when the amp is idling. Depending on which
website you read, the recommended maximum for this is either 70%
of 14W (=9.8W) , or 50% (=7W) (14W is the max of what the 6V6GTA
valve can stand when at max volume). Reduce that 14W to 12W for
6V6GT without the A). I believe a target of 70% (10w) is too
high, but 50% sounds sterile on my amp. .. see the 'mistakes' paragraph below.
It's important to note that as you
adjust the cathode current, the plate voltage will also change, so
you have to re-check both measurements after each adjustment.
Experienced valve-heads will have known from the start that it's this wattage calculation which
really matters, and they probably had a wattage in mind
to aim for, because they know how hot or cool they like their
6V6s... (!). If you email me with a question about this stuff, or
post it on a discussion page, please state the cathode current AND
the plate voltage. Without knowing the plate voltage, the current
on its own has little meaning.
A high level of accuracy is not needed (I'm sure you've noticed I wrote my wattage result as 7.7W and not 7.722W!). In that example I was aiming for 7W (50% of max) and got 7.7W (55%) . Considering all the inaccuracies which could have come into my measurements, and considering there will be no practical difference to the amp's sound, the difference between those 2 figures is not worth readjusting for.
The third check is to measure the current on the other valve, which we haven't touched yet. If you've installed the 1 ohm resistors, measure the voltage across the other one! If you're clipping a multimeter in line with the braid and setting it to mA, do the following; switch off the amp, unplug from the wall, remove the multimeter clips, remove the 2 power valves, resolder the braid to pin 8, go to the other valve socket, unsolder the braid from pin 8, connect the multimeter like it was on the first valve.
Replace the valves, fire up the amp and let it warm up thoroughly. Set the volume and master knobs to zero. Check the current on the second valve is within a couple of mA of the first. Measure volts on pin 3 (careful) and do the same sum for static dissipation wattage. If it's all fairly close, you're finished. If not, you may not have a matched pair of valves after all. You can check this by swopping the 2 new valves with each other (switch off and let them cool first). If the considerably higher current moves with the valve, the valves aren't matched; take it up with the supplier. (Of course, you might like the sound of unmatched valves - as you turn up the volume you're going to get 'asymmetric clipping' and if you like heavy-sounding Chicago blues, this might be exactly what you want.) If the considerably higher current is always on the same socket, time to call in an amp tech (sorry). In this latter case, your ears might already have told you something was wrong even before you took out the old valves.
12 Closing Up
Switch off the amp and unplug from
the wall. While the valves are cooling, use the time to make
detailed notes of what you've done and file them with the manual,
or stash them in the floor of the cabinet, or something. Have a
last look at all the soldering work you've done and satisfy
yourself it's going to survive a couple of years of vibration and
heat cycling! If you weren't using the 1 ohm resistors, remove the
valves, make sure the braids are securely soldered back onto pin 8
on each valve socket, and replace the valves again. Now
leave the amp switched on for half an hour, check the sound again,
let it cool, and reassemble.
back to top of rebiasing method
back to top of page
Postscript I; what if I put the old valves back?
It makes sense to keep old valves as spares, if only to finish a gig (but always swop them in pairs).
If you didn't make any bias adjustments, fine. I had to adjust mine for cooler running, so if I put the old ones back, they will run cooler than before. (I have tried this and they sound just a little less warm than before, but it's still an ok sound). If you had to make serious adjustments in the hot direction, then your old valves would run seriously hotter than before.
Postscript II; mistakes
I have made since then
There is no point in making your own mistakes if someone else has already made them for you. I hope these help someone...
After a few gigs and rehearsals, it felt as though the amp had become quieter compared with just after the rebias job. Also the distortion was going bwaaaaaatatat rather than creeeeeeeaaaamy smooooth. So I opened it up and rechecked. Lo and behold, the bias current had dropped to 20mA. I went all around the loop again, changed a resistor again, and settled on 28mA this time. I have read on some discussion pages that new valves/tubes can drift in their early hours of use. Your valves may behave differently. BUT I was wrong to reset the bias, because the nasty noise still came back and it turned out to be a dying preamp valve. AND I was wrong not to measure the volts at pin3 or do the maths for the static dissipation wattage.
A couple of gigs later I was playing with the amp master volume on 7. During a long number with a lot of hard rhythm playing throughout, the amp volume faded away. I went easy on the volume for one verse and the volume came back. I wondered if the valves were running too hot. Then I read a discussion on the Fender Discussion Page in which Unquiet was suggesting that 50% of max is a better target for static dissipation wattage and that 70% is too high.
I opened up my amp and measured the cathode current - still 28mA. Then I measured the plate voltage (pin3) and it was 417V, which calculates out at 83% of max. Much too high. It had given me a rockin' sound, but at what cost? So I rebiased, aiming at 50%, and stopped when I got 55%. The current was 18mA, which I had previously thought was too low; however, it played just fine. The difference is, (with a Strat, input volume at 9, mid-boost on) I got the start of smooth, fluid power amp distortion with the master volume at 5 when it was biased at 28mA, but at 18mA the master volume had to be at 7 for the same tone. So, not much lost, and greater peace of mind.
return to final
checks
Here's a table of the results I had for one pair of valves. They
will be different for your amp and your valves, but they
illustrate roughly how this adjustment behaves... note that this
table is only for 'shunting' (paralleling) the 10K resistor, ie,
trying to 'cool' the valves because they were running too hot with
the factory bias resistor values. I think these valves (Mazda NOS)
ran hotter than most - ie, fitting another pair without adjusting
the amp would result in cooler running. At the time I settled on a
6.8K resistor for 55% of max.
|
|
resulting resistance |
|
(pin 3) (Volts) |
|
|
| 16k | 6.2k | 28 | 417 | 11.7 | 83 |
| 8.2k | 4.5k | 20 | 427 | 8.5 | 61 |
| 6.8k | 4k | 18 | 429 | 7.7 | 55 |
| 4k | 2.9k | 13 | 429 | 5.6 | 40 |
Incredibly Simple Method for
People who Don't Know One End of a Screwdriver from the
Other
NB this method comes with
an even bigger disclaimer than the other ones.
 Fit new power valves. Play the amp
medium loud. If it sounds bad, switch off immediately and go to a
tech. Or go to the top of this document and do the rebiasing.
Fit new power valves. Play the amp
medium loud. If it sounds bad, switch off immediately and go to a
tech. Or go to the top of this document and do the rebiasing.