STRIPPED-DOWN REDESIGN
INTERIOR
PHOTOS for reference
BACK TO MAIN MODIFICATIONS PAGE
PRII
home
created Feb 2013
email me...
SPAMDEFEATstratopastor@hotmail.com
This is more than a modification
really... it's a simplification of the circuit, invented by Jon
Hundt in the Netherlands and reported to me by Scott Murray in the
US. They have both done this rebuild. There aren't any sound clips
available yet but Scott tells me it approximates to the sounds
shown on reviews of the Fender '65 Deluxe Reverb Re-Issue. Scott
is prepared to answer questions - email him on smurray (at)
taskpartner (dot) com.
Jon writes...
" I bought the PRII new in 83 but was never really
satisfied with it. I thought the "lead" channel sounded bad, and
the clean channel didn't live up to the Fender legend. Before I
bought it I had a blackface Bassman, and a blackface Super
Reverb, so I knew what a proper Fender should sound like to me.
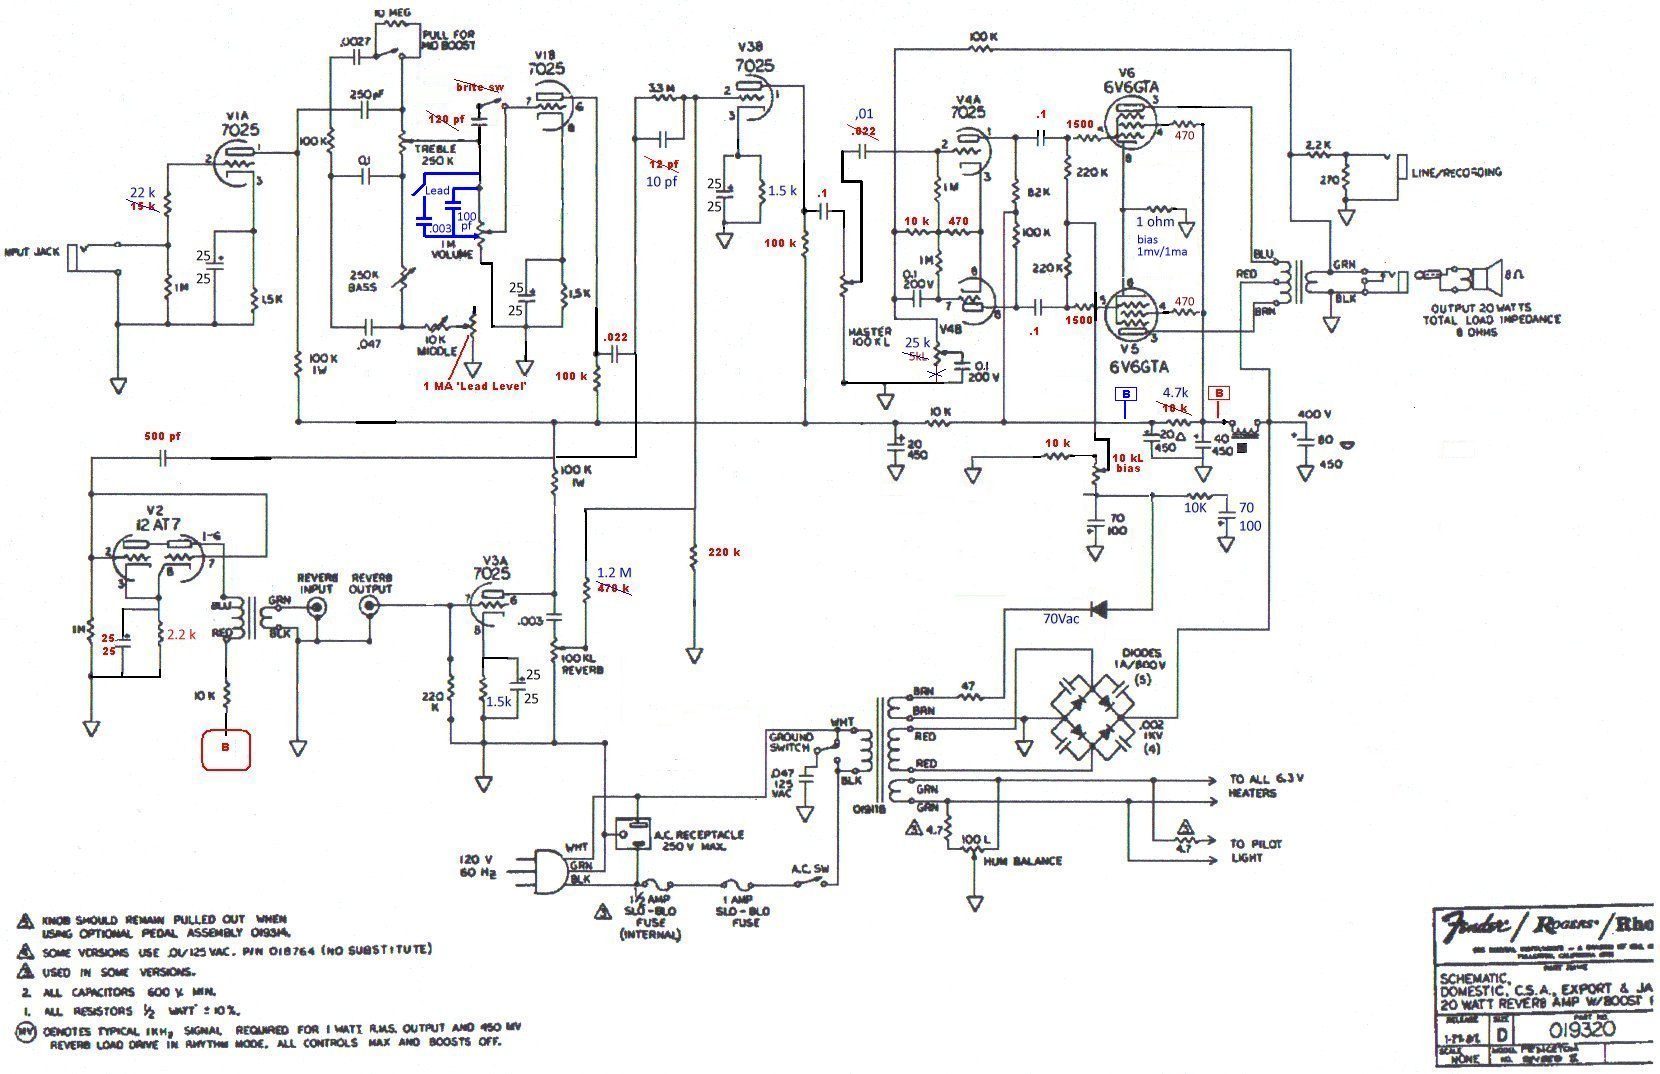
I looked at the schematic and
noticed that the amp had a Deluxe-Reverb output transformer and
choke, and that the reverb transformer was the standard Fender
unit. The schematic was a mass of components - I had never
learned to read electronics at that point. But by comparing the
PRII to a Deluxe Reverb schematic I soon saw that the whole DR
circuit was in the amp (except the vibrato part). The problem,
it seemed to me, was that there were way too many other parts
that were NOT on the old AB763 circuit.
I removed all the surplus parts,
stripping the amp down to the basic Fender blackface circuit. I
took out all the switching parts, since I never used the
footswitch anyway. I changed a few component values to match BF
specs. I kept a few features, like the mid-boost, the master
volume, the line-out. I wired the "Lead Volume" pot as a
variable resistor on the tail of the tone stack so that the tone
circuit can be disabled - adding a great amount of gain and a
whole lot of midrange, if desired. This is similar to the Allen
Amps "raw" control. I wired the Presence control more like the
old 5F6A bassman version. I added a bias adjustment pot. I
also changed the speaker to a Celestion Vintage 30 (and added a
Weber Beam Blocker).
The amp now sounds really good.
It is basically a blackface Deluxe Reverb without the
vibrato/tremelo and without the Normal channel.
I ran 6L6 tubes for
several years, and they sounded great. I was a bit worried about
the extra current draw, but nothing ever broke down. Lately I
switched to JJ 6V6s and they sound just about the same as
the 6L6s.
The mods were almost all
non-destructive, and I utilised the existing black fiber
eyelet-board. I still have a bag full of the parts I removed.
In those days a PRII wasn't
considered valuable or collectible; I already owned it and it
didn't satisfy me, so I didn't mind modding it. These days it
might put some people off because most people seem to think we
shouldn't change Fender amps.
I am attaching my current
schematic and the original so that you can compare them and see
what I did. ( I may have to send a following email with the
original, my email program doesn't seem to like sending both at
the same time). On the drawing I have labelled in red the parts
that I changed values. Also, since I made that drawing I have
removed the ground switch and cap, and the AC receptacle; and I
substituted an Allen TO26 output transformer. This wasn't so
much to improve the sound, but to give me an option to switch
impedance depending on what kind of tubes I have in there.
If you superimpose the modified
circuit over the original (on a light table, or taped up on a
window, that's how I do it) you will see clearly all the parts
that I removed.
I'm not really sure I
would encourage anyone to do this to a PRII these days, as they
seem to have become collectible. But it sure worked for me.
Everything is reversible - though it's such a rat's nest in
there, compared to older Fender amps, it would probably be
pretty confusing. And, from the outside, the amp appears
completely stock."
Scott writes...
I made his (Jon's) changes, and in blue you can see a
few of my further changes. Thus, that schematic is my amp.
I now own the most gorgeous
sounding amp in the world. It sings like an angel.
And it's almost impossible to
find a bad knob setting. I could let a two-year-old kid play
with the knobs and it would still have a good sound.
Even with the junkie original
speaker (remember I had the heavy upgraded speaker), it rocked.
Then as a treat I installed a Celestion G12H and it is out of
this world.
I did the changes one component
at a time, starting in the preamp section, and played the amp a
lot between each change. I was apprehensive at the start, but
after just a few changes, the amp started to sound warmer. So I
kept going, one change at a time. It took weeks to get all the
way through, but at no point did a change make it sound worse;
it just kept getting better."
So... here's the schematic for
what they're recommending. As noted above, the changes in red are
Jon Hundt's work and the blue changes are by Scott Murray. I have
added further notes from Scott below the schematic in which he
explains some of his component-value changes. I thank them both
for getting in touch. If you try this circuit, or any part of it,
let me know what you think of it.
More notes from Scott:
"I had the same PRII experience that Jon wrote about: I
bought the PRII new in 83 but was never really satisfied with
it. There were a small number of knob settings that sound "OK",
but it took a lot of hunting to find them. Then in early Jan 2013, I found an old guitar forum
post from a jhundt that said this about his PRII: I bought
one brand-new in '83, and I was disappointed. I didn't try it
out in the shop; I just thought "it's a Fender, it will sound
good" It was very sterile when clean, and the boost was not
useable (for me).
-------------------------------------------
As with all the other
pages on my site, the details are believed correct but I won't
take any responsibility for what happens if you attempt them.
Valve/tube amps store lethal voltages even when switched off and
unplugged from the wall, and if you don't know what you're
doing, you can be badly
hurt.
If you have tried
any modifications, I would be delighted to hear from you -
even if you're not satisfied with the result, it's useful
information for the rest of us! I'm specially interested if
you've converted to cathode bias,
converted to tube (valve) rectification, or added
a sag resistor.
back
to top
PRII
home
BACK
TO
MAIN
MODIFICATIONS PAGE
rebiasing
dismantling