last update Feb 2022: advice on
impedance corrected
Disclaimer - (1) I know
next to nothing about this. I enjoyed my PRII with the factory
speaker in it. Do I really prefer the replacement I fitted, or do
feel I ought to simply because of the time and money spent? I
think there's a genuine improvement. And others quoted below
clearly aren't kidding when they rave about their new speaker. But
you choose.
Disclaimer - (2) This is all subjective and none of my
contributors is claiming that any brand of speaker is badly made
or poor value for money, so please don't sue them or me.
Disclaimer - (3) Because this is so subjective, please do
not blame me if you spent as much on some legendary speaker as you
did for the whole amp, and then found you liked the original
speaker better. However, your opinion might be worth repeating
here if you think others may be similarly disillusioned.
I have replaced my original
speaker with a Jensen C12N reissue (Sep 04). After a couple
of rehearsals with my band, here are my impressions. Compared to
the original, it has more sparkly top end, more bass, and little
more efficiency. At low volume (say master = 3 ) this speaker is
louder than the original. At higher volumes the cone breaks up
earlier, providing speaker distortion at lower volume than the
original. At the max volume I don't think this speaker is louder
than the original, due to cone breakup and (I think) the mild
compression effect of the ceramic magnet. In general the sound is
a little more detailed and 'organic' or 'natural'. The cheap power
valves (which I had in the amp most of the time) used to sound a
little nasty when pushed into distortion, but this speaker somehow
makes them sound OK. It took 2-3 hours of playing at medium
volume to 'break in'.
I didn't think the original
speaker is the dog which some folks make it out to be. But the
Jensen improvement is worth the $45 (30 GBP, 2004) I paid South
Valley Vintage Amps in Gilroy, California, USA (warmly recommended
outfit). Knowing what I know now, I don't think I would have paid
$100 for this kind of improvement, but that's just me and my
Scottish heritage showing through.
With the original speaker I
used to get a pretty natural-sounding acoustic sound from my
Yamaha acoustic with a Martin piezo pickup. It's not so natural
with the Jensen! Can't win them all... maybe this says the original speaker was deliberately
chosen for a neutral sound in order to make the amp as versatile
as possible. (Obviously I don't mean Fender intended the
amp it for acoustic amplification, but I don't believe they chose
the speaker carelessly, as some folks seem to suggest.)
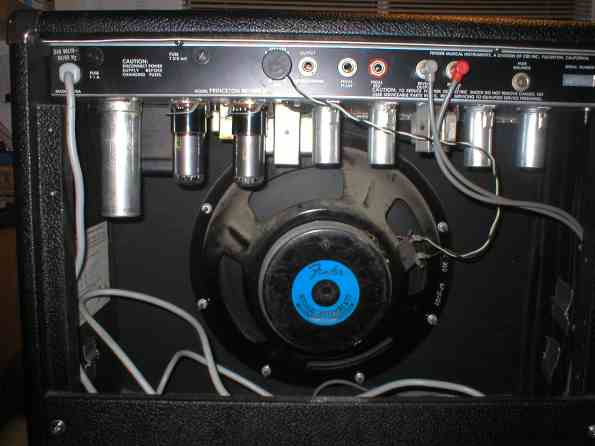
Technical bit
The PRII puts out 22W RMS, expects an 8 ohm speaker, and is built
for a 12" speaker. The original speaker was rated at minimum 50W -
I say this because two of the same speakers were used in the 100W
amp, the Twin Reverb II. The baffle board (front panel where the
speaker goes) is 20mm ply and the speaker hole is 270mm diameter.
It's held in place by eight screws with 11/32" nuts. (9mm
does
ok but it's not quite right). If you fit a
speaker of less than 22W power handling you can expect it to blow
eventually, with a real chance of taking some part of the amp with
it. (In fact some folks say, a valve/tube amp needs a speaker
rating of twice the amp's RMS rating. This is what Fender did for
this amp.) It's often said that one Fender amp you can use a
different impedance up or down by a factor of two without damage
(in this case, 4 to 16 ohms) which opens up wide possibilities in
using other speakers or cabs. In extreme-volume situations
a higher impedance than the amp-maker's stated value of 8 ohms
will stress the primary winding of the OT, and a lower impedance
will stress the secondary. That can get expensive. If
you get a different diameter speaker... it won't fit in the hole!
Duh! ......However this still leaves you with plenty of choice if
you want to replace the speaker.
The original speaker (Eminence
version) weighs about 3Kg (about 6.6lb). Almost any
replacement speaker will weigh more, except the neodymium
types.
Different speaker models come
with varying numbers of mounting holes. After removing the original speaker you may
have to remove some of the original mounting pegs. Don't break
them off! They will unscrew - this is done from the FRONT of the
speaker baffle - remove the grille (see the dismantling
page) to get at the cross-heads, and remember they're reverse
thread, so turn them clockwise to get them out. (That's the
wood-thread which is reverse thread. The nut-thread is normal.)
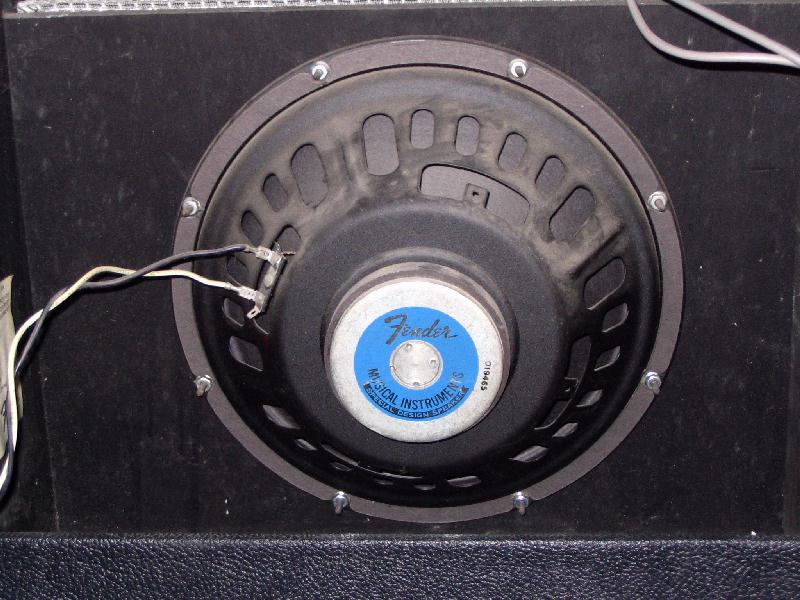
The Original Speaker
The standard-model factory-fitted speaker was Fender
part number 019465. In the early days it was made by Pyle and had
a smaller magnet assembly. That part number didn't' change when
Fender changed to Eminence. I don't think there's much difference
in the sound, and it definitely makes no difference to the value
of the amp. Two of these were used in the 100W Twin
Reverb II, so I assume they're rated at 50W. The Eminence
weighs about 3Kg (6.6lb). There's a range of amp serial
numbers running from F309xxx to F312xxx (includes part of 1983
and part of 1984) where it could be a Pyle or an Eminence. Maybe
there was a time when they had Ps and Es on the shelf, all mixed
up. And I already know the serial numbers weren't issued
consecutively. Maybe both kinds of randomness were in operation
at the same time.
Pyle normal-issue
speaker from start of production
Eminence normal-issue
speaker from 1983 onward.
photo - Greg G
(thanks!)
photo - me. I've done some dusting since.
The Original Upgrade Speaker
The PRII was offered with an Electro-Voice speaker as a
factory-fitted option, called model 12F. (The same Fender
part number speaker was used as the EV upgrade in the London
Reverb, which is rated at 100W, so I assume that's the rating
for the speaker!). I don't know how much more it cost or
weighed. I was pleased to hear from Greg in Texas. He bought his
PRII, with the EV option, new in 1982. He had the chance
temporarily to change his speaker for the Pyle or Eminence,
and reports that the EV is much, much louder. The thought
scares me because I think the PRII is plenty loud with the stock
speaker. The EV looks like this;
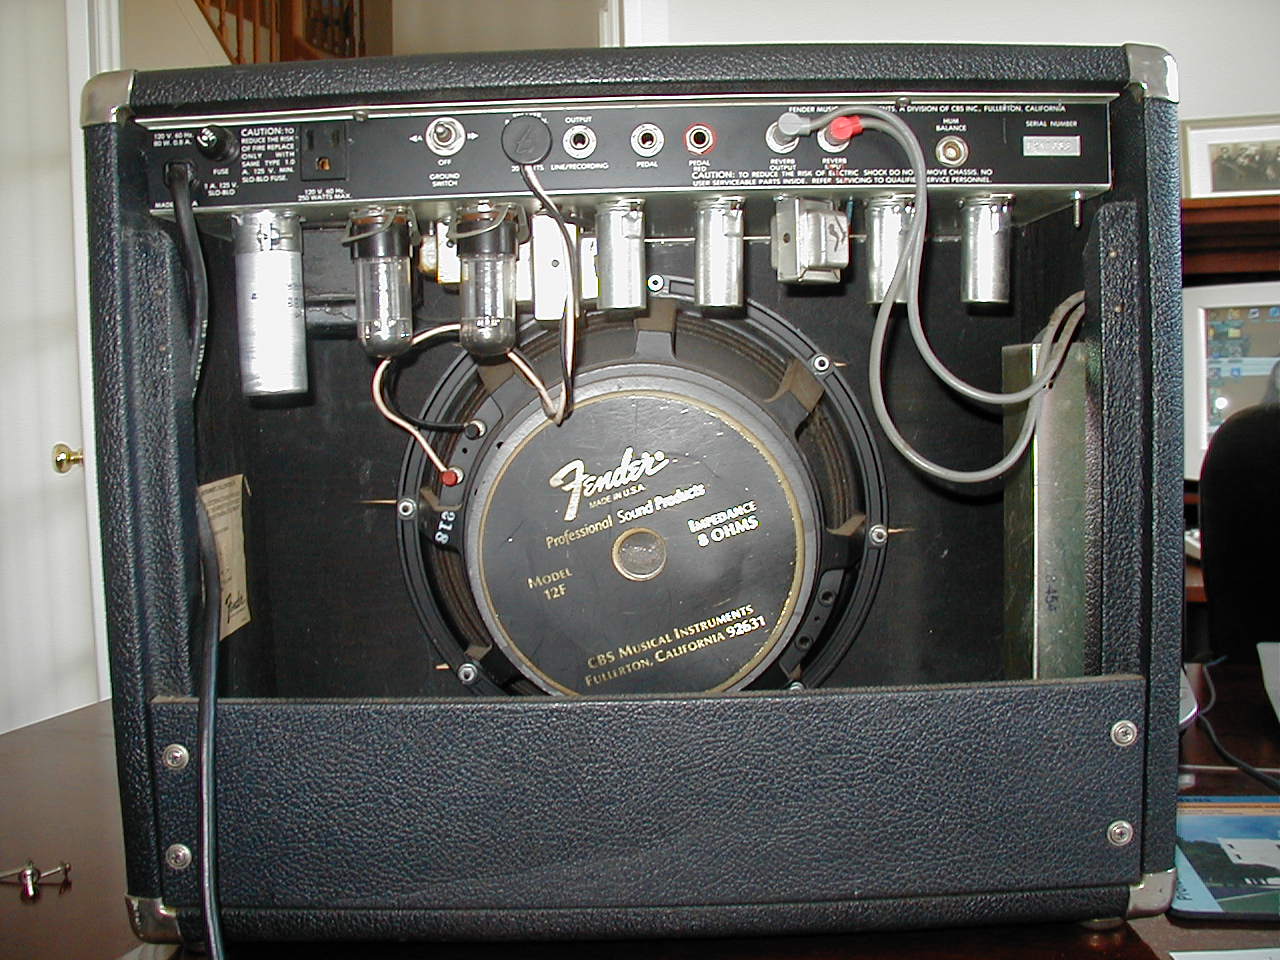
(photo
-
thanks
to Bob Herrmann)
Big magnet, eh? I wonder what
effect that has on the sound. Viewed from the front, this speaker
has an aluminium central dome - under normal lighting it's visible
through the grille cloth - which makes me think it produces
piercing highs. One contributor below says it was great for clean
work. He replaced his with a Celestion Greenback, which has a more
bluesy reputation. But I haven't heard either.
Paul Rivera (the man who specified the amp) said of the EV speaker
"The issue there was more about getting the cone moving. Those
EVMs have very stiff cones and spiders. At low level, they were
the coldest, least inspiring loudspeaker you ever heard, but turn
them up and they were magical." That's from this
interview.
Replacement Options
A different speaker will make your amp sound different. There are
trade-offs to capitalise on, or beware of. You could choose
another speaker purely on efficiency, and end up with a speaker
which is far louder but sounds dreadful. Speakers also introduce
their own type of distortion when pushed hard; it's a different
kind of distortion to that introduced by the electronics, and has
a distinct character of its own which we may or may not like. It's
called 'cone break-up'; it's the opposite of the hi-fi ideal of
the speaker behaving as a 'perfect piston'. You could fit a
speaker which has a far higher power rating; it will last forever
and will never add any of its own distortion (which will be a plus
or a minus depending on your taste). Or you could fit a speaker
with no spare power handling capacity, so the amp can push it into
cone break-up more easily.
Then there's which material
the cone's made from, the magnet type (ferro, alnico, ceramic),
the magnet size, the material of the centre cap, the presence or
absence of varnish on the edge of the cone (doping)... the options
just go on and on. Alnico magnets 'compress' the dynamic range -
as you turn up the volume, it eventually reaches a point where it
doesn't get any louder, just distorts more (but in a nice way).
Ferro magnets do this least, with ceramics in between.
(The original speakers,
all types, are rear-loaded - see photos above - they're bolted
to the back of the baffle-board. Some speaker cabs are
front-loaded, ie, you bring the speaker to the cab from the
front and it makes contact with the front of the baffle-board. I
believe that's preferred if the speaker is very heavy or the
baffle-board is weak. Plus it moves the speaker about 25mm
forward compared to rear-loading, so if you've got a very deep
speaker.... anyway, I can't imagine anyone wanting to do this on
a PRII but if you do, then you have to read the new speaker's
specification sheet carefully for the required hole-dimension
and baffle-board thickness. The existing baffle-board hole is
270mm diameter, and the board is 20mm thick. The rest of this
page assumes rear-loading.)
If everything else appears
equal, check how many screw holes there are around the rim of the
speakers you're considering buying. The original has eight,
evenly spaced around the circle. If your new one has six, you'll
have to spend an extra hour removing two screws and precisely
re-positioning four others. Celestions need four, I believe, so
that would simply mean removing the other four.
With some other amps, you
can't fit some speakers (even with the correct cone size) because
the magnet is too big and hits some part of the chassis.
Considering how big the magnet is on the EV speaker factory
option, magnet-size probably isn't an issue on the PRII, but please
let me know if you run into such a problem. Also - a
tech on the FDP described this - with a non-standard
speaker, it is possible, on some amps, for the new
magnet to be too big / too powerful / too close to one of the
valves/tubes; you can fit the speaker in, but the magnet bends
the electron beam inside the valve, thus reducing the signal! I
mention this for interest; I don't think it's going to happen on
a PRII.
Browse through the discussion
pages linked from the PRII
home page and you'll see folks raving principally over
Webers, Jensens, Tone Tubbys, WGS, and Celestions. Older
Jensens seem to be regarded as the classic Fender-tone speaker.
Weber are applying modern techniques and huge amount of know-how
to offer a wide range of different-sounding speakers. Jensen are
no longer made by the original owner of the Jensen name or by
'vintage' methods; they do 3 relevant ranges, C12K, C12N and
a C12P; all made in Italy; all seem to have their fans. Celestion,
apparently, sound British (surprised?), which means they're
probably useful for playing the bad guys in American films. One
guy I'm in touch with has a Scumback speaker. Who thinks up these
names? I'd be pleased to hear from you if you've used any of the
above, or others I haven't heard of.
Some new speakers need to
be 'broken in' - that is, the flexible parts are stiff when
new and don't sound very good for the first 2 or 3 hours of use.
After that time they become louder with a fuller tone. This was
true of my new Jensen. Some people 'break in' the speaker before
fitting - they connect it to a radio and leave it playing for a
couple of days. Others say that doesn't help, and it only 'breaks
in' when used for the purpose you bought it for, so just
play loud and be patient. If you're anything like me, you need the
practice anyway.
I worked all this out for
myself, and so could you, but hey, it only took me half an hour to
write up.
You need a new
speaker, a cross-head screwdriver and a 9mm or 11/32" spanner. (As
I said above, 9mm isn't quite right but it does. 11/32"
spanner is exactly right.) Maybe a wood drill,
maybe some new speaker connecting tags.
Warning; the speaker
screws have very sharp pointed ends (why?). They are like
8 spikes waiting to hurt your hands and damage the speaker cone.
Switch off the amp, unplug it
from the wall, pull the speaker jack out of the back panel.
Gently pull the speaker lead
off the tags.
After removing the chassis,
you need the spanner to loosen the eight nuts HALF WAY ONLY
on the eight speaker screws. (Normal thread; loosen
anticlockwise). A ring spanner might not fit around the nut (mine
did - just) because of the shape of the speaker metalwork (the
'basket'). A socket won't work unless it's a very long socket,
because the screws are long and the socket won't sit down far
enought to reach the nut. Once the nuts are loose you can use a
socket, with no handle, to unscrew them HALF THE LENGTH of the
screws.
Now check the speaker pulls
away from the baffle-board. It it's sticking, it may need some
gentle prising away. Once you're sure it's detached from the
baffle-board, you can safely remove all the nuts, hold the speaker
really firmly, and lift it clean out of the cabinet. Don't drop it
onto the screws (they will damage the cone).
My new Jensen C12N Reissue has
eight mounting holes and went into the cabinet with no changes to
the screws. Because of this, the whole job took less than an hour.
(If you need to remove or re-position screws, this is done
from the front of the baffle board with a cross-head
screwdriver. You've already removed the speaker grille as part
of the dismantling process. The thread which holds the screw in
the wood is reverse thread so they come out clockwise. Remove
the unneccessary screws and/or drill new holes in the baffle
board as necessary.)
Think about which way 'up' the
speaker should be - in my case there are eight steps around the
circle; eight ways the speaker could go in. The obvious thing is
to rotate it so the label reads the 'right way up' but the real
question is, will the speaker lead reach from the tags to
the speaker socket? Also it's important that the speaker lead
doesn't lie close to any of the parts that will get hot, so it's
best to turn the speaker so the tags point to the 'input' side of
the amp.
So choose which way 'up' the
speaker will go, place it carefully over the screws (again,
avoiding cone damage), place and tighten the nuts, but not
as tight as if you were working on a car; you don't want to
distort the shape of the speaker metalwork. (Tightening is
normal thread; clockwise. Engineers will want to tighten one
screw, then the one opposite, then another, then the one opposite,
etc etc. Non-engineers will never understand why that's important
to engineers, and shouldn't worry about it). Connect the speaker
lead to the speaker (the Jensen uses the same size tags as the
original). Put the chassis back. Replace the upper rear panel.
Reconnect all leads. Job done! Now play it hard for a couple of
hours to 'break it in', and finally email me with what kind of
speaker it is and the difference it's made.